WordPress, an Open Source content management system, is by far the most used CMS on the web. What made WordPress such a pervasive technology is mainly due to its extensive list of plugins. Plugins allow developers to put together large or otherwise complex websites in a shorter period of time. Either developed in house or downloaded from the WordPress plugin repository, they can range from simple style alterations, to image slideshows, to entire frameworks.
Some plugins may only be temporary in the development process, only being used once, to do a time consuming job. WordPress’ Bulk Page Creator is a great example of a temporary plugin, used once and then removed when the developer has done their task. Other types of plugins are more permanent solutions, that becomes an integral part of your website. One such plugin is Contact Form 7, a form generator, capturing user information like name, email, telephone numbers and other contact information.
With more than 1 million active users Contact Form 7 (CF7) has proliferated throughout the WordPress ecosystem. It’s clear to see CF7 is not just another contact form plugin, as its strapline would suggest. When installed, CF7 enables website administrators to manage a website’s data collection points, adding input fields, text areas, checkboxes, file uploads and many other options. Simple and flexible, we can add, edit or delete as many fields as our WordPress Theme will allow. Once we have collected our data and the user has hit the submit button, Contact Form 7 will send this information to an email address of our choosing.
CF7 Basics
I’m going to assume we already have the plugins installed, else we will need to download it from the WordPress repository. With that said, let’s login to our site and click “Contact” from the left hand side menu.
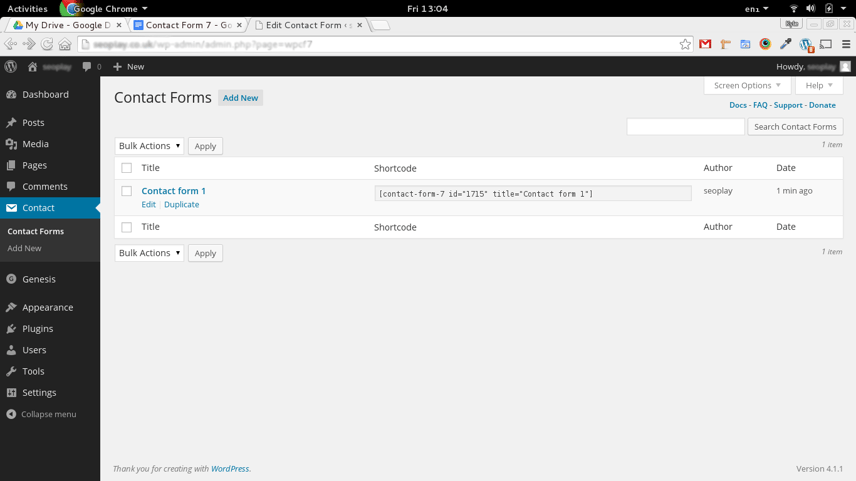
If you already had Contact Form 7 installed, chances are that you already have some forms created. For now though I will be using the form that comes with the plugin. Take note of the “Shortcode” column, the code found here is what we paste wherever we want our forms to appear. Notice that we have an “ID” and “Title”, the ID is automatically generated when we create a form, but we are able to define the Title inside the editor. That being said let’s go ahead and edit our form.
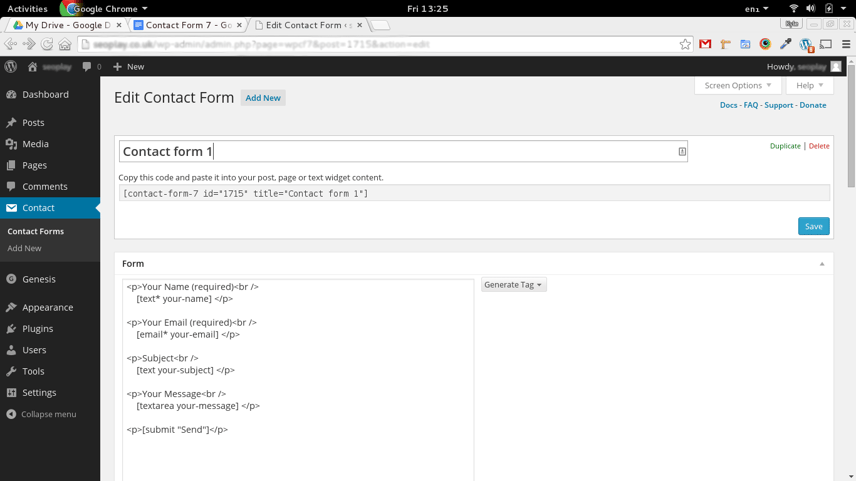
Our first editable field is the title, this is where our shortcode is pulling its title value, right now it should say “Contact Form 1”. The fact that this is editable isn’t immediately obvious, not on the version of CF7 I’m using anyway. We’ll leave the title with its default value for now.
From there we can look at the “Form” section, this is where we define our input fields. The default form that comes with CF7 has 5 items, name, email, subject, message and submit. Before we get into editing or adding more fields, let’s first try to understand how these 5 items are constructed. Specifically, what we are most interested in, are the strings wrapped in square brackets i.e. [text* your-name].
Here we have our first value; “text*”, this value defines the type of field that will display on our page, the asterix (*) symbol means that this value must be filled in. If this is false the form will not send. Our next value “your-name” is where a lot of first time users get confused, this is partly because whilst it is user defined, it also must be unique within the form, so if we wanted we could remove “your-name” and put in “monkey”. This is the minimum information CF7 requires for most fields to output them onto our web pages, and they can be looked at as “[type name]”.
Using the screenshot above, our example brackets ([text* your-name]) have two attributes, the type of the field and the name. As we can see, we have the type “text*”, this means the input field that is generated will only except general letters and/or symbols. Our second value is the name of our field; “your-name”, this should be unique to our form and we will be using this further on in our tutorial. Together these two values are the minimum requirements needed for CF7 to generate an input field.
You may wonder why we have <p> tags around the input fields, you may be surprised to know that we can type plain old html in here too. The <p> tags are there so that if we decide to keep the text “Your Name (required)” it shall be styled the same as the rest of the text on your site. The W3C also advise your input fields are wrapped in these tags for this very reason. It’s something to keep in mind when we generate our own fields. Let’s get started on adding fields.
Click the “Generate Tag” dropdown on the right hand side and click text field.
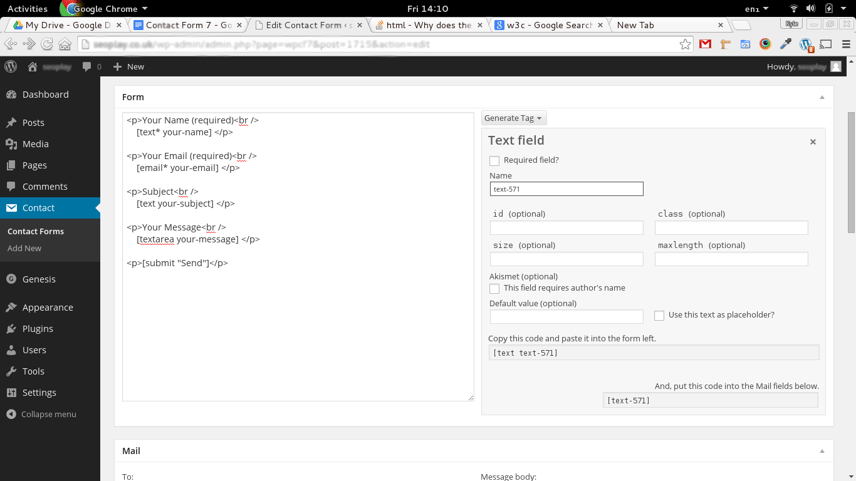
Beneath the dropdown you will see that a clean user interface has appeared, this is where we will be customising our fields. You will see that our “Name” field has automatically generated a unique name (text-571), but we are able to give this a more meaningful name, something like “enquiry-name”, but it must be unique to this form.
I think we are now in a good position to start editing our options, whenever we make changes keep an eye on the generated tag at the bottom. You will notice that our tag will acquire more attributes as we select more options, attributes like, placeholder, id, class and others, depending on the type we are editing.

Check the “Required” box and you will notice that our tag has re-generated with the asterix (*) symbol next to the type attribute. As I explained before, this would mean that the field would have to be filled in before submitting.

Add other options if you wish and you will notice CF7 adding more attributes to our tag, we can now copy and paste the tag into the form on the left hand side. Remember that we can add any text and/or html to the tag, and as I mentioned before it’s generally good practice to wrap your tag with <p> tags.
Mail section
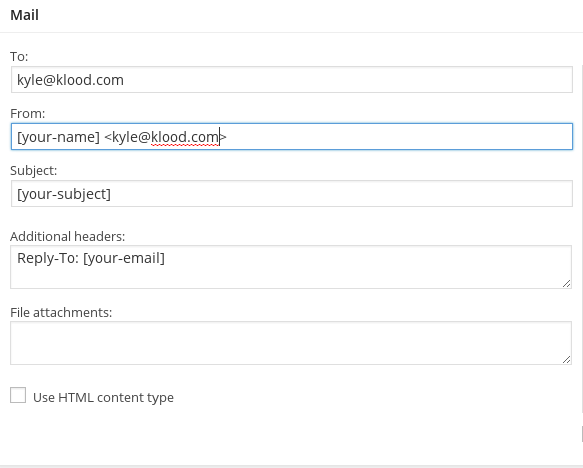
On the left hand side of the mail section, we can put any of our tags in, this time though we only need the name of the tag. You can put as many addresses as you like into the “To” section, separated by commas. The next field “From” requires a little imagination, here we shall use the “[your-email]”, remember we only need the name of our tag, not the type, placeholder or any other options that may have been generated. This tag will hold the email address of the user that filled out your form, so you can start to build something like “[your-name]<[your-email]>” and the person receiving the email will know who contacted them.
Knowing this, we can fill out the rest of the form, either using fixed values such as kyle@klood.com or using our dynamic tags ([“your-email”]) that pull the information from the filled in forms.
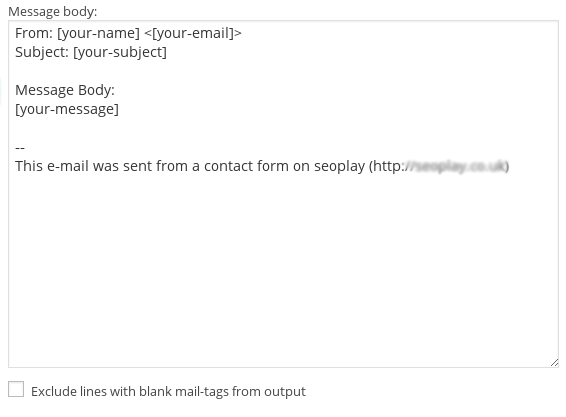
Message body
The form on the right hand side is the contents of the email, using the same logic as described before, we can enter in our tags. It’s generally a good idea to enter all of our tags into this section (minus the submit button) so that whoever is receiving the email has all of the information they may need.
Response Email
If you look below the mail section you will see a “Mail 2” checkbox, click the checkbox and an identical form as the one above will drop down. The difference here is that this will be going to the person who filled out the form. This type of email is usually a “Thank you” message, and it works exactly the same way as the form above.

Our final step is to actually place our forms on the page we want, at the top of the page we see our shortcode “[contact-form-7 id="1715" title="Contact form 1"]” or something similar. We can paste this code in a number of places depending on how your WordPress site had been built. You can place it in a sidebar, widget area, page or post, when they are published or saved our forms will be output onto the page.
The developer of Contact Form 7 Takayuki Miyoshi has created even more plugins that offer more options and extensions to Contact Form 7. That will be it from me today though, I hope you have enjoyed this tutorial and you have a better understanding of Contact Form 7 and perhaps WordPress in general. Speak soon!
Stay Updated with Our Latest Insights
Get expert HubSpot tips and integration strategies delivered to your inbox.


.jpg)
